Project Cocina de Camilla #1.5: Homemade Potato Strips

On my Project Cocina de Camilla #1, I said that I have a plan on what kind of slice I’ll do the next time I make homemade potato chips. So…

TADA!!!

I used my mandolin slicer’s blade that produces julienne cut to make potato strips! ๐Ÿ˜€

Homemade Potato Strips

My family and I loved the thinner and smaller slices I accidentally created on my first try of homemade potato chips because they were a lot crispier. And so I thought, “Heeeeeyyyy, maybe I should deliberately make thinner and smaller slices of the potatoes for that consistent crispiness.” So with that, I thought of turning the chips into strips, and the rest is history. ๐Ÿ˜›


The Essentials and the Expenses

Since this was my second try, I already have all the other essentials for this project, except for the potatoes, of course, so this experiment was really light on my budget.

Essential #1: 100-peso worth of potatoes
Price: 100 pesos from the public market

 Essential #2: Peanut Oil
Price: N/A, readily available at home

 Essential #3: Mandolin Slicer
Price: N/A, readily available at home

Essential #4:  Kitchen Towel
Price: N/A, readily available at home

Essential #5: 2 cooking pots
Price: N/A, readily available at home

Essential #6: 1 strainer
Price: N/A, readily available at home

Essential #7: 1 container for the finished chips
Price:  N/A, readily available at home

Essential #8: Iodized salt
Price: N/A, readily available at home

Total Project Expenses: 100 pesos


Preparing and Cooking the Potato Strips
The directions here were obviously the same with Project Cocina de Camilla #1 except for the cut and the stupidity I made with my previous in which I put the cooked potatoes on a strainer first before finally transferring them to a container filled with kitchen towels (That was totally unnecessary, a waste of time, and embarrassing!).

Regarding the julienne cut, I realized that it took more effort and strength to achieve it using the mandolin slicer since unlike on the chips which only required horizontal cut, the julienne cut for the strips had both the horizontal and the vertical at the same time, so it was like more than five blades working on the same potato but different parts. Well, in spite of that, at least now, I was wiser enough to use the protective holder so there weren’t any blood dripping from my thumb the whole time I did the exhausting slicing of the potatoes. That was a nice change there. YEY! HAHA.


So whatโ€™s my verdict for Project Cocina de Camilla #1.5: Homemade Potato Strips? Another SUCCESS, of course! ๐Ÿ™‚


The only mistake I did was because the strips were cooked in three batches, the last got burned a bit because at that time, the oil was already really, really hot, thus, the strips on it tasted quite bitter. Good thing the strips on the third were only few so it didn’t affect the whole bunch. Anyway, that’s another thing I learned: Be careful on the last batch if there’s any. ๐Ÿ˜›

Project Cocina de Camilla #2: Puta-not’s Puttanesca

The first time I tried puttanesca, I swore to myself I’d try cooking it someday. And hey, guess what, this is that promise’s fulfillment. I finally made it! ^_^

Puta-not's Puttanesca 01

Part of my preparation for cooking this pasta was to check other restaurants’ puttanesca–Pizza Hut’s and Bigoli’s–aside from Friuli Trattoria’s to make sure I get the right taste of it. During my food testing, I realized that I don’t like those green stuff called capers so I vowed to look for a puttanesca recipe online that didn’t include capers on its ingredients. The Pioneer Woman’s recipe was the answer to my prayer.


The Essentials and the Expenses

Contrary to puttanesca’s rumored origin, some of its ingredients are quite expensive, at least in the Philippines, like the olives and olive oil. So just like in my Project Cocina de Camilla #1, I made a lot of alterations here, too, either because some of the ingredients on my recipe source were too hard to find or I simply didn’t like them.

The biggest change was increasing the amount of the ingredients by a hundred percent of those prescribed on The Pioneer Woman’s recipe. This was because my Mom told me the night before cooking that the serving suggested on the recipe wasn’t sufficient for a family with a monstrous appetite likes ours. Well, I got her point so I followed her.

Anyway, below are the essentials of this project with their corresponding prices:

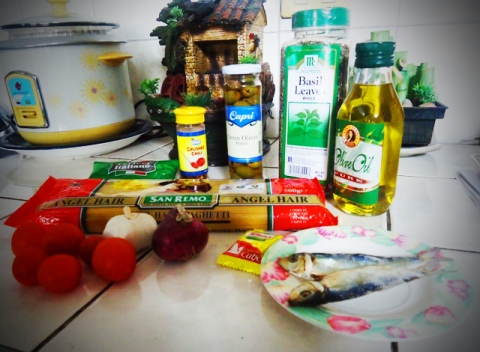
Essential #1: 3 cups cherry tomatoes, halved
Bought:  4 boxes of Dizon Cherry Tomatoes
Prices: 48.88 pesos (0.188kg)
43.16 pesos (0.166kg)
45.76 pesos (0.176kg)
41.08 pesos (0.158kg)
from SM Supermarket

Essential #2: 16 ounces (around 500g) Angel Hair Pasta
Bought: 1 500g San Remo Angel Hair Spaghetti
Price: 71.50 pesos from SM Supermarket

Essential #3: Whole red onion, sliced
Bought: N/A, readily available at home
Price: N/A

Essential #4: 4 cloves garlic
Bought: N/A, readily available at home
Price: N/A

Essential #5: Crumbled parmesan cheese
Bought: 1 100g Perfect Italiano Parmesan Cheese
(Already crushed)
Price: 176 pesos from SM Supermarket

Essential #6: Crushed chili
Bought: 1 25g SM Bonus Crushed Chili
Price: 39.50 pesos from SM Supermarket

Essential #7: 1 cup pitted olives
Bought: 1 140g Capri Pitted Green Olives
(140g is not enough. It’s only equivalent to 1/2 cup)
Price: 53 pesos from SM Supermarket

Essential #8: Basil leaves
Bought: 1 180g McCormick Basil Leaves
Price: 222 pesos from SM Supermarket

Essential #9: 4 tablespoons of olive oil
Bought: 1 250ml Doรฑa Elena Pure Olive Oil
Price: 117.50 pesos from SM Supermarket

Essential #10: 1 1/2 cups of chicken broth
Bought: 1 Knorr Chicken Broth Cube
Price: 6 pesos from a nearby store

Essential #11: 8 pieces tuyo or dried fish filets
Bought: 8 pieces dried fish
Price: 15 pesos from a nearby store

Essential #12: 2 cooking pots
Bought: N/A, readily available at home
Price: N/A

Essential #13: Mortar and pestle
Bought: N/A, readily available at home
Price: N/A

Total Project Expenses: 879.38 pesos

Puta-not's Puttanesca 02


Preparing and Cooking the Puttanesca

While cooking this, I found out that pasta-making is easy albeit the preparation is quite long. I got a little bit nervous only because hey, it was my first, and with the modifications I made, who wouldn’t feel butterflies in their stomach?

Anyway, the firsts in my preparation were to cook the 500g angel hair spaghetti for strictly two minutes (I used a timer! haha) as instructed on its plastic, boiled the chicken broth cube, sliced the onion and cherry tomatoes according to how the recipe I followed did them, then removed the heads, scales, and bones of the tuyo. (A note on the tuyo: Fry the tuyo first to remove their skins. I tried doing otherwise and discovered that the scales don’t get peeled off for they stick to the dried fish meat if raw.)

The next instruction goes, “Mash (in this order) garlic, [tuyo], and olives using a mortar and pestle,” but since the tool available at home is small, I ground only the garlic and tuyo first, placed them on a plate, then crushed the olives separately. I mixed all the three up on the plate.

Now here starts the best part: The cooking. I heated the olive oil in a cooking pot then added the sliced red onion after a little while and cooked it for a few minutes. When they were already color caramel, I put the cherry tomatoes and cooked them until they almost didn’t resemble being halved tomatoes (This wasn’t on the direction given, in fact, if you’ll look at the photo provided by The Pioneer Woman, the halved tomatoes were still visible on the finished puttanesca. But looking at the sizes of what I bought, I decided that they would be too big for the Asian mouth. hehe)

I then poured the broth and stirred for a couple of minutes. When I thought that the sauce was finally okay, I added the pasta and mixed everything with all my might (500g of pasta was a lot, I learned! Mixing it was tiring!).

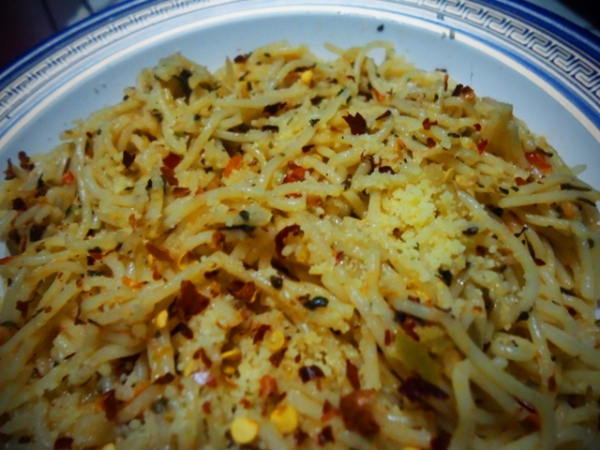
As I was stirring for already a couple of minutes, I began to feel disappointed because my pasta had yet to achieve the same color as with that of The Pioneer Woman. I didn’t stop though. I sprinkled some parmesan cheese on it but stopped when I realized it won’t be enough. I’d just have those who would eat put some on their plates themselves. I also sprinkled generously the basil leaves I bought (No, not whole leaves as instructed, but pounded since whole ones were nowhere to be found on the supermarket.). Then I kept stirring to make sure the sauce and the pasta got mixed up well. After that, that’s it.

The whole time I was cooking, my Mom kept on going near me to comment on the heavenly aroma of puttanesca and check what I was doing. She was actually the first one to notice that my puttanesca looked dry, but still, when she had a taste of it, she instantly loved it!

At first I didn’t want to believe but when my brother tried it, he loved it, too. In fact, he had another plate right after the first and even bought a liter of coke for it. My sister also had two rounds of it the next day (She went home very late when I cooked because of her OJT, thus, “the next day”.) and also said it was delicious. WHOA.

Of course, I ate too and though it was indeed dry, it did taste puttanesca. The ingredients couldn’t be denied, especially the olives, albeit I only used 1/2 cup of it instead of 1.

The crushed chili I bought was sprinkled by the eaters to their plates depending on how spicy or not they wanted their pasta were. This made the taste of the puttanesca better.


So whatโ€™s my verdict for Project Cocina de Camilla #2: Puta-not’s Puttanesca? Still a SUCCESS despite it lacking in sauce! The deliciousness of the puttanesca prevailed. I just have to add more amount per sauce ingredient to avoid it becoming dry the next time I cook it. =^_^=


P.S. I think I get it now why they say those who cook the food lose the appetite to eat what they cook. As I said above, my Mom kept on coming to me once in a while to remark about the smell of my puttanesca, but I couldn’t relate to what she was saying ’cause I couldn’t smell a thing! Another, I was way too exhausting with all the stirring I did that I just wanted to rest when it was done. Anyway, at least I know how to cook my favorite puttanesca now. And hey, again, it was a success. ๐Ÿ™‚


—-

SOURCE:
The Pioneer Woman

Project Cocina de Camilla #1: Homemade Potato Chips

Ladies and gentlemen, welcome to the launching of my Project Cocina de Camilla, a chronicle of my adventures in cooking now that I decided that it’s about time!

For my first try, I wanted something so easy since I still didn’t know if I’d be a complete nitwit about this art or not. Good thing I read Yahoo! News Philippines every morning after checking my Yahoo! Mail at work, so one day I saw a title “How to Make the Perfect Potato Chip“, clicked it, and tadaaa! it became the first in my little project.

I was excited about it ’cause I love potatoes, in fact, I can survive a day just eating french fries! (Errr… If you happen to have read my other food blogs, you might have encountered me saying a lot of times that I love this food and that. Well that’s because I really love food in general. haha). So without further ado, here’s my first try at cooking…

Homemade Potato Chips


The Essentials and the Expenses

It was my first try, so although I followed the directions to the dot, I made tiny alterations on the essentials. An example is that the article I read said I needed four Russet potatoes, and although I came to know through the Internet that they’re large, rough potatoes, I just asked my mom to buy me a kilo of potatoes from the public market, so I couldn’t be finicky, and besides, I didn’t think there would be any difference if I bought the regular ones.

Anyway, here are the essentials of this project and my expenses:

Essential #1: 1 kilo of potatoes
Price: 60 pesos from the public market

Homemade Potato Chips 6

 Essential #2: 900ml Sun Oil Peanut Oil
Price: 439.50 pesos from SM Supermarket

Homemade Potato Chips 5

Essential #3: Smart Cook Mandolin Slicer
Price: 399.75 pesos from SM Department Store

Homemade Potato Chips 4

Essential #4: Sanicare Jumbo-sized Kitchen Towel
Price: 54.75 pesos from SM Supermarket

Essential #5: 2 cooking pots
Price: N/A, readily available at home

Essential #6: 1 strainer
Price: N/A, readily available at home

Essential #7: 1 container for the finished chips
Price:  N/A, readily available at home

Essential #8: Iodized salt
Price: N/A, readily available at home

Total Project Expenses: 954 pesos

(#3 is optional, I could’ve just used a knife, but then I thought, hey, I love potatoes so I’m sure this isn’t the first and last time I’ll use it, and mom and I can still use it on some other vegetables and fruits. I also imagined the ease it would bring in cutting potatoes into thin slices. So I purchased it. ^_^)


Preparating and Cooking the Potato Chips

Since this is homemade potato chips and its main ingredient is real whole potatoes, making it isn’t as easy as the deep frying we see when we buy french fries outside. For one, they’re not ready-made, and two, they’re chips, so there are certain steps to take to make them crispy.

So as instructed in the article, I cut the potatoes thin to attain that crispiness which made potato chips popular back in the day. I used the mandolin slicer for this but somehow, I couldn’t do the 1/8-of-an-inch thinness ’cause it was too hard. I even cut my right thumb twice because I was still too stupid to figure out that my new equipment comes with a protective holder to use for my safety. Anyway, I still continued hoping that the slices I made, which were immediately tossed in a pot of water to remove the residual sugar, were still okay.

Homemade Potato Chips 3

Then the next step is to dry the potatoes out by laying them in kitchen towels and rolling and squeezing them to remove as much water as possible. If you’re wondering what’s this for, it’s because the second best part in potato chips after the potatoes themselves is the oil, so it’s important that each slice absorbs enough of it when being deep fried.

See how thick my slices were? Pffft.

See how thick and uneven my slices were? Pffft. Anyway, first time, first time… Hehe

And then there was the deep frying. I did this in two batches because a kilo of potatoes is actually plenty, and a 900ml of peanut oil isn’t enough after all.

Ahh… Wait. So why peanut oil? My mom was a bit surprised about this so she asked me why I bought an expensive oil when we have a canola oil at home. Well, aside from what I said above that I followed the directions to the dot, I read on the web and at the back of the bottle I bought that peanut oil, which is made from raw peanuts, is commonly used in frying because it has a high smoke point of 225 ยฐC (437 ยฐF), and it’s also healthy due the low saturated fat and high polyunsaturated and monounsaturated fat contents. It smells great and so peanut-y, by the way, and it adds flavor to the potato chips.

Anyway, back to deep frying. My home doesn’t have a kitchen thermometer so even if the article said that the potato slices should be put in the pot at 200 degrees and then slowly heat up to the frying temperature of 350 degrees, I simply estimated this part by assuming 200 degrees is the middle size of the flame on the gas stove, while the 350 degrees is the largest. I guess our stove can’t be heated too much, though. The article said the potatoes would reach golden brown at 3-4 minutes, but according to my timer, it was already 16 minutes when mine got to the said color. Well, either that, or my slices were indeed thicker than advised.

Homemade Potato Chips 2

When my chips were cooked, I removed them from the pot and placed them in a strainer first before finally putting them in a container lined with kitchen towels around. As I write this part, I started wondering why I had to use the strainer when I could toss the chips directly to the bowl. haha. Next time, next time… XD

The Yahoo! article also gave the ingredients and how-to’s of the seasonings, barbecue and sour cream and onion, but I just used iodized salt because the peanut oil’s rich taste on the chips was already enough as a flavor. My family liked it, so was I, though my brother opined that some, those with bigger slices, tasted like cassava chips (Read: First try). Our favorite ones were those smaller and thinner slices which were a result of my inexperience in the use of a mandolin slicer and cutting stuff itself. Because of that, I already have a plan on what kind of slice I’ll do on my next try with potato chips, but it’s a secret for now. hehe


So what’s my verdict for Project Cocina de Camilla #1: Homemade Potato Chips? SUCCESS! =^_^=


P.S. I spent 954 pesos and more than two hours of my life for this project when I can simply buy a bag or two of chips for less than 100 pesos, open it, and happily gorge it. What a waste of time and money, you can say out loud. But, hey, at least with this homemade potato chips that I personally made, I can be sure that there aren’t any unnecessary ingredients on it like MSG and stuff, only potatoes and oil–I’m not saying that deep frying is healthy, but still, there isn’t any other way to make chips but to fry them, right? Moreover, I learned how to do it. There’s a big difference between knowing how something came to be and not knowing at all. So when the world ran out of our favorite chips, at least I can make myself some as I please and as long as there are potatoes and oils around. ๐Ÿ˜‰


—-

SOURCES:
Yahoo! She Philippines
Serious Eats
Wikipedia